Visual Studio Upload App to Windows Store
Visual Studio Team Services extension for the Windows Store
This extension provides tasks to automate the release of your Windows apps to the Windows Shop from your continuous integration environment in Visual Studio Team Services (VSTS). You no longer need to manually update your apps from Windows Dev Center.
Quick start
-
Ensure you meet the prerequisites.
-
Install the extension.
-
Obtain and configure your Dev Center credentials.
-
Add tasks to your release definitions.
Prerequisites
-
You lot must have an Azure AD directory, and you must have global administrator permission for the directory. You tin create a new Azure AD from Dev Eye.
-
You must associate your Azure AD directory with your Dev Center account to obtain the credentials to let this extension to admission your account and perform actions on your behalf.
-
The app y'all want to publish must already be: this extension can simply publish updates to existing applications. You can create your app in Dev Center.
-
You must take already created at least ane submission for your app earlier you can use the Publish task provided past this extension. If you lot have non created a submission, the task will fail.
-
More than information and extra prerequisites specific to the API tin can exist found hither.
Obtaining your credentials
Your credentials are comprised of three parts: the Azure Tenant ID, the Client ID and the Client cloak-and-dagger. Follow these steps to obtain them:
-
In Dev Center, become to your Account settings, click Manage users, and associate your organization's Dev Middle business relationship with your organization's Azure AD directory. For detailed instructions, see Manage account users.
-
In the Manage users folio, click Add Azure Advertisement applications, add the Azure AD application that represents the app or service that you will apply to access submissions for your Dev Middle account, and assign information technology the Manager role. If this application already exists in your Azure Advertising directory, you can select it on the Add together Azure Advertisement applications page to add it to your Dev Eye business relationship. Otherwise, yous can create a new Azure Ad awarding on the Add Azure Ad applications page. For more information, see Add and manage Azure Advert applications.
-
Return to the Manage users page, click the name of your Azure AD awarding to go to the application settings, and re-create the Tenant ID and Client ID values.
-
Click Add together new key. On the following screen, copy the Key value, which corresponds to the Client secret. Yous will not be able to admission this info once more after you leave this page, and so make certain to not lose it. For more than data, run into the information about managing keys in Add together and manage Azure Advertising applications.
See more details on how to create a new Azure AD awarding account in your organizaiton's directory and add together it to your Partner Center business relationship here.
Configuring your credentials
Once you have obtained your credentials, you must configure them in VSTS so that the extension can admission your Dev Center business relationship and publish on your behalf. You must install the extension before being able to configure your credentials. In one case the extension is installed, follow these steps:
-
In VSTS, select your projection and get to the Projection settings folio. Click the Services tab. Expand the New Service endpoint dropdown, and select Windows Dev Center
-
In the pop-upward box, fill in your credentials in the corresponding text boxes (Azure Tenant ID, Client ID and Client Secret). For the Connection Name, you can choice any name of your choosing. For the Server URL, use the default value "https://manage.devcenter.microsoft.com/".

- Click OK to confirm. Your endpoint is now configured and will be accessible by the extension's tasks.
Using the extension
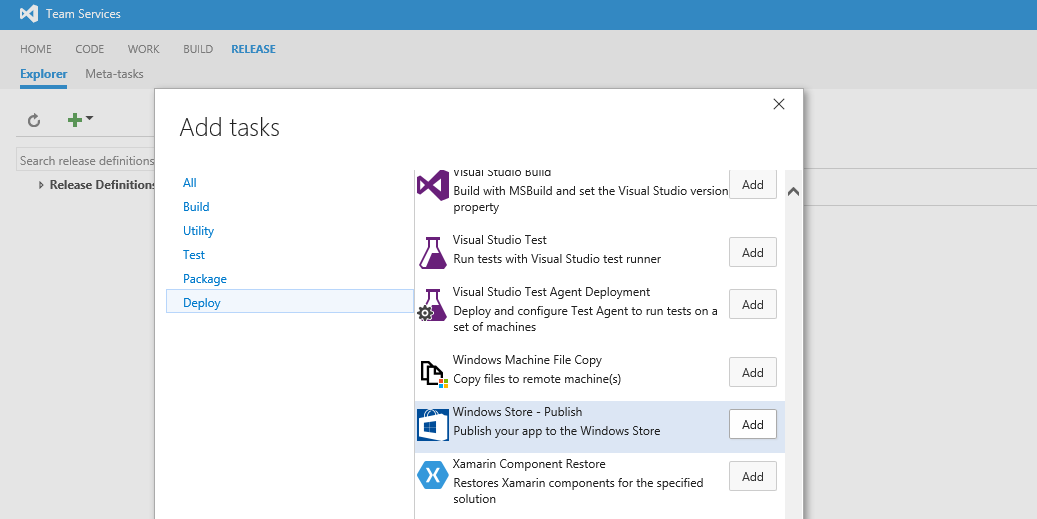
This extension provides release tasks. You tin can admission them from your project by clicking the Release tab, and selecting an existing release definition or creating one. Select your chosen surround, and so click Add tasks. The tasks contributed by this extension are in the Deploy department.
Task reference
Windows Store - Publish
This task allows you to publish your app on the Store by creating a submission on Dev Center. It has the post-obit parameters:

-
Service endpoint - The endpoint containing the credentials you wish to use. Typically this volition exist the endpoint you created when configuring your credentials.
-
App identification method - How to identify the app to publish: by name or ID. If unsure, select "Master proper name".
-
Application main proper noun / ID (Text, required) - The identification for the app. Depending on your selection, this should be either the app ID (visible in the URL of the app's page on Dev Center) or the app primary name (visible on the app'south page on Dev Eye).
-
Delete awaiting submissions (Checkbox) - If checked, volition endeavour to delete any in-progress submission before starting a new 1. Note that merely one submission at a fourth dimension tin can exist pending. Therefore, if this box is not checked and a submission is already pending, the chore volition fail. Furthermore, submissions created on the Dev Middle UI cannot exist deleted automatically by the task.
-
Metadata update method - How to update the app's metadata. Options are No Update, Text Metadata or JSON-formatted Metadata. In the showtime case, the app's metadata volition not be changed from the previous submission. In the latter cases, the app's metadata will be updated according to the expected format.
-
Metadata path (File path, required if visible) - Path to a directory containing the metadata to update (appears when selecting some other selection than No Update for the metadata update method). The expected format is detailed below.
-
Packet path (File path, optional) - Path to your app's main package (usually a file in .appx, .xap or .appxbundle format). Minimatch pattern is supported.
-
Additional package(s) (Text, optional) - A list of paths, one per line, of boosted packages that your app needs, for example to support multiple platforms. Each individual path supports Minimatch pattern.
-
Skip polling (Checkbox) - If checked, volition skip polling the submission after committing it to Dev Centre. Otherwise, it will proceed polling the submission till it gets published (which typically takes around 2 hours). Warning: If y'all check this box, y'all will not run across errors, if any, that your submission may come across. You will have to manually check the status of your submission in Dev Center.
-
Delete Packages (Checkbox, optional) - If checked, volition enable deletion of one or more one-time packages (sorted by version). Checking this box volition enable a dropdown "Number of packages to keep" explained in following point. If non checked, volition not delete whatever old packet.
-
Number of Packages to keep (Picklist, required) - Specify number of latest packages (sorted past version) to be kept per unique target device family and target platform. For example, if you have a mix of 3 singled-out packages each for Windows x desktop, mobile and Windows 8.1 X64 platform (so in total nine packages), and you specify 2 in this box, then the oldest packet in each group volition be deleted (total packages after deletion will be 6).
You simply have to select the packages yous want to update. If you have a package that volition not be updated as function of your release, you exercise non accept to specify it.
Metadata format
The metadata format for the Publish task is as follows:
$(Metadata path) └ $(linguistic communication codes) (e.yard. en-us) ├ baseListing | ├ metadata.json OR $(attribute).txt | └ images | └ $(prototype type) (eastward.g. MobileScreenshot) | ├ $(paradigm).png | └ $(image).json OR $(attribute).$(image).txt └ platformOverrides (optional) └ $(platform) (eastward.g. Windows81) └ (Aforementioned structure as under 'baseListing') Examples are available beneath.
If the Metadata update method parameter is set to Text Metadata, text files are expected. If it is prepare to JSON-formatted Metadata, and so JSON files are expected. All binder and file names are case-sensitive.
If text files are expected, then there should exist one text file per metadata attribute that you wish to update, and it should accept the same name as the attribute in question. For string attributes, the entire file contents will be used equally-is. For assortment attributes (due east.grand. keywords, hardware capabilities), each non-empty line will exist considered as an element of the array.
If JSON files are expected, so each JSON file must incorporate an object which has the attributes that you wish to update.
Metadata from the previous submission is always preserved if it is not present in the provided folder. For example, if you do not provide a "clarification.txt" file in your listing, the description volition remain the same as it was in the last submission.
You can notice the list of accepted attributes for the language code listings here. Annotation that the task volition automatically set the images attribute for you based on the file structure you provide, so y'all should non specify it as it will be overridden.
You can find the list of accepted names for platform overrides here.
In the case of images, images from the previous submission are deleted, and must therefore be supplied once more. Accepted attributes for the images can be found hither. Note that the task will automatically set the fileName, fileStatus, id and imageType attributes for you, then you should not specify them as they will exist overridden. The imageType aspect will represent to the name of the folder in which your image is placed. The listing of accepted image types tin can be found here.
The Store only supports images in png format. If you include images in whatsoever other format, they will be ignored.
Metadata structure example
Hither are two examples of metadata structures, 1 for JSON attributes and one for text attributes.
appMetadata ├ en-u.s. | ├ baseListing | | ├ metadata.json | | └ images | | └ Screenshot | | ├ mainScreenshot.png | | ├ mainScreenshot.json | | ├ controls.png | | └ controls.json | └ platformOverrides | └ Windows80 | └ metadata.json ├ cs-cz | └ platformOverrides | └ WindowsPhone71 | └ images | └ Icon | ├ czIcon.png | └ czIcon.json └ fr-ca └ baseListing └ metadata.json appMetadata ├ en-the states | ├ baseListing | | ├ description.txt | | ├ features.txt | | ├ keywords.txt | | └ images | | └ Screenshot | | ├ mainScreenshot.png | | ├ clarification.mainScreenshot.txt | | ├ controls.png | | └ description.controls.txt | └ platformOverrides | └ Windows80 | ├ clarification.txt | └ releaseNotes.txt ├ cs-cz | └ platformOverrides | └ WindowsPhone71 | └ images | └ Icon | ├ czIcon.png | └ description.czIcon.txt └ fr-ca └ baseListing └ features.txt Windows Shop - Flight
This task allows yous to publish your app to specified flight on the Store by creating a submission on Dev Center. It has the post-obit parameters:

-
Service endpoint - The endpoint containing the credentials you wish to apply. Typically this will be the endpoint you created when configuring your credentials.
-
App identification method - How to place the app to publish: by name or ID. If unsure, select "Master name".
-
Application principal name / ID (Text, required) - The identification for the app. Depending on your selection, this should exist either the app ID (visible in the URL of the app's page on Dev Center) or the app primary proper name (visible on the app'southward folio on Dev Center).
-
Delete awaiting submissions (Checkbox) - If checked, volition attempt to delete whatever in-progress submission earlier starting a new one. Note that just ane submission at a fourth dimension tin can exist pending. Therefore, if this box is not checked and a submission is already pending, the task will fail. Furthermore, submissions created on the Dev Middle UI cannot be deleted automatically past the job.
-
Flight name (Text, required) - Friendly proper noun of the flying group (as seen on the Dev Center) that you want to update the submission for.
-
Package path (File path, optional) - Path to your app'due south primary package (usually a file in .appx, .xap or .appxbundle format). Minimatch pattern is supported.
-
Additional package(due south) (Text, optional) - A list of paths, one per line, of additional packages that your app needs, for example to support multiple platforms. Each individual path supports Minimatch pattern.
-
Skip polling (Checkbox) - If checked, will skip polling the submission afterwards committing it to Dev Centre. Otherwise, information technology will go along polling the submission till it gets published (which typically takes around 2 hours). Alarm: If you check this box, you will not see errors, if any, that your submission may run into. You will have to manually check the status of your submission in Dev Center.
-
Delete Packages (Checkbox, optional) - If checked, will enable deletion of one or more than onetime packages (sorted past version). Checking this box will enable a dropdown "Number of packages to continue" explained in following bespeak. If not checked, will not delete whatever old packet.
-
Number of Packages to go along (Picklist, required) - Specify number of latest packages (sorted by version) to exist kept per unique target device family and target platform. For example, if you have a mix of 3 singled-out packages each for Windows x desktop, mobile and Windows viii.1 X64 platform (then in total 9 packages), and you specify 2 in this box, then the oldest parcel in each group will be deleted (full packages subsequently deletion will be 6).
You simply take to select the packages you want to update. If yous have a parcel that volition not be updated as office of your release, you practise not have to specify information technology. You lot take to specify at to the lowest degree one package.
If you accept questions, send usa an e-mail hither.
Click hither to report a bug or make a suggestion.
Source: https://marketplace.visualstudio.com/items?itemName=MS-RDX-MRO.windows-store-publish
Posting Komentar untuk "Visual Studio Upload App to Windows Store"